The software source that comes with Ubuntu 16.04.01 is Nginx 1.10.0, but there are bugs in the HTTP/2 module of this version of Nginx, [see here for details](https://imququ.com/post/nginx-http2 -post-bug.html). Now Nginx 1.12 Stable has been launched, just install the Stable version directly. Update 2018-06: If you are using Ubuntu 18.04 or later, the default Nginx version (1.14) from the system’s repositories is sufficient.
Regarding dual certificates, only recommended for those who use independent IP, if there is no independent IP, then the SNI function needs to be enabled - however almost all browsers that support SNI function also support ECC certificates, so you can skip to After the upgrade steps, directly replace the ECC certificate of Let’s Encrypt without using the RSA certificate. I have more than one server, and it would be too troublesome to use Nginx compiled by myself, so I decided to use the method of adding software sources and upgrade through apt, the method is as follows: First, you need to add the software sources of Nginx mainline:
1 | $ sudo add-apt-repository ppa:nginx/stable # sudo apt install software-properties-common |
Then remove the existing Nginx and install the new version:
1 | $ sudo apt remove nginx nginx-common nginx-core |
During installation, you may be asked whether to replace the original default configuration file, just select N. The Nginx installed at this time already contains almost all necessary and common modules, such as but not limited to GeoIP Module, HTTP Substitutions Filter Module, and HTTP Echo Module. The OpenSSL version of Nginx I installed is 1.0.2g-fips, so it does not support CHACHA20. If you want to support CHACHA20, you can only use CloudFlare’s Patch and compile it yourself. After the installation is complete, you can verify the Nginx version:
1 | $ nginx -V |
At this point, your server has no Nginx HTTP/2 bugs. Since you use the latest version of Nginx, you can configure the ECDSA/RSA dual certificate.
Nginx Upgrade Pit
When I upgraded, I encountered the problem that the GeoIP module could not be used. After research, it was found that the new version changed GeoIP to a dynamic call module method. Adding the following code to the http {} configuration of Nginx solved it:
1 | load_module "modules/ngx_http_geoip_module.so"; |
Issue Free Multi-Domain Certificates with Let’s Encrypt
Let’s Encrypt provides a completely free and automatically issued certificate. A certificate can sign up to 100 domain names, and wildcarding is not supported. In order to configure dual certificates, you should first issue two certificates. The following takes acme.sh as an example, first create a directory (all the following cases use example.com As an example, the actual use needs to be replaced by yourself):
1 | $ mkdir -p /etc/letsencrypt |
Then modify the Nginx configuration file to ensure that all those listening on port 80 have the location ^~ /.well-known/acme-challenge/ block. This configuration file is a case of forcing a jump to HTTPS. This is the configuration of the origin site :
1 | server { |
Before issuing, make sure all domain names to be issued point to your own server! Then issue an RSA certificate (if you need a multi-domain certificate, you only need multiple -d, the same below, but the saved file directory and certificate display name are the first domain name):
$ acme.sh –issue –reloadcmd “nginx -s reload” -w /var/www/html -d example.com –certhome /etc/letsencrypt/rsa
Then issue the ECDSA certificate:
$ acme.sh –issue –reloadcmd “nginx -s reload” -w /var/www/html -d example.com -k ec-256 –certhome /etc/letsencrypt/ecdsa
Uninstall the cron that comes with acme.sh and reconfigure it yourself:
$ acme.sh –uninstallcronjob
$ vim /etc/cron.d/renew-letsencrypt
Enter the following, taking care to replace the path of acme.sh with the absolute path of your installation:
1 | 15 02 * * * root /path/to/acme.sh --cron --certhome /etc/letsencrypt/rsa |
Then you’re done, and the certificate automatically renews.
Add or Delete Domain Name to Certificate
Because Let’s Encrypt does not use wildcard domain names, it often encounters new subdomains. At this time, you need to add a domain name to the certificate. A certificate can add up to 100 domain names. The easiest way to add is as follows: First, modify the configuration file of the certificate. The configuration files of both certificates must be modified:
1 | $ vim /etc/letsencrypt/rsa/example.com/example.com.conf |
Find the Le_Alt line and add the new domain names to the back (each domain name is separated by a comma, the total cannot exceed 100). Then to start re-issuing this certificate, you need to add -f.
1 | $ acme.sh --renew -d example.com --certhome /etc/letsencrypt/rsa -f |
It should be noted that the intermediate certificate and root certificate of the ECC certificate issued by Let’s Encrypt are currently not ECC certificates, which will be supported in the future. For details, see [Upcoming Features](https://letsencrypt.org/upcoming-features/ #ecdsa-intermediates).
Configure Nginx
First you need to generate a few keys:
1 | $ openssl rand 48 > /etc/nginx/ticket.key |
Then add the following content into Nginx and put it under the http or server block. Although CHACHA20 is not supported, adding it in has no effect.
1 | ## |
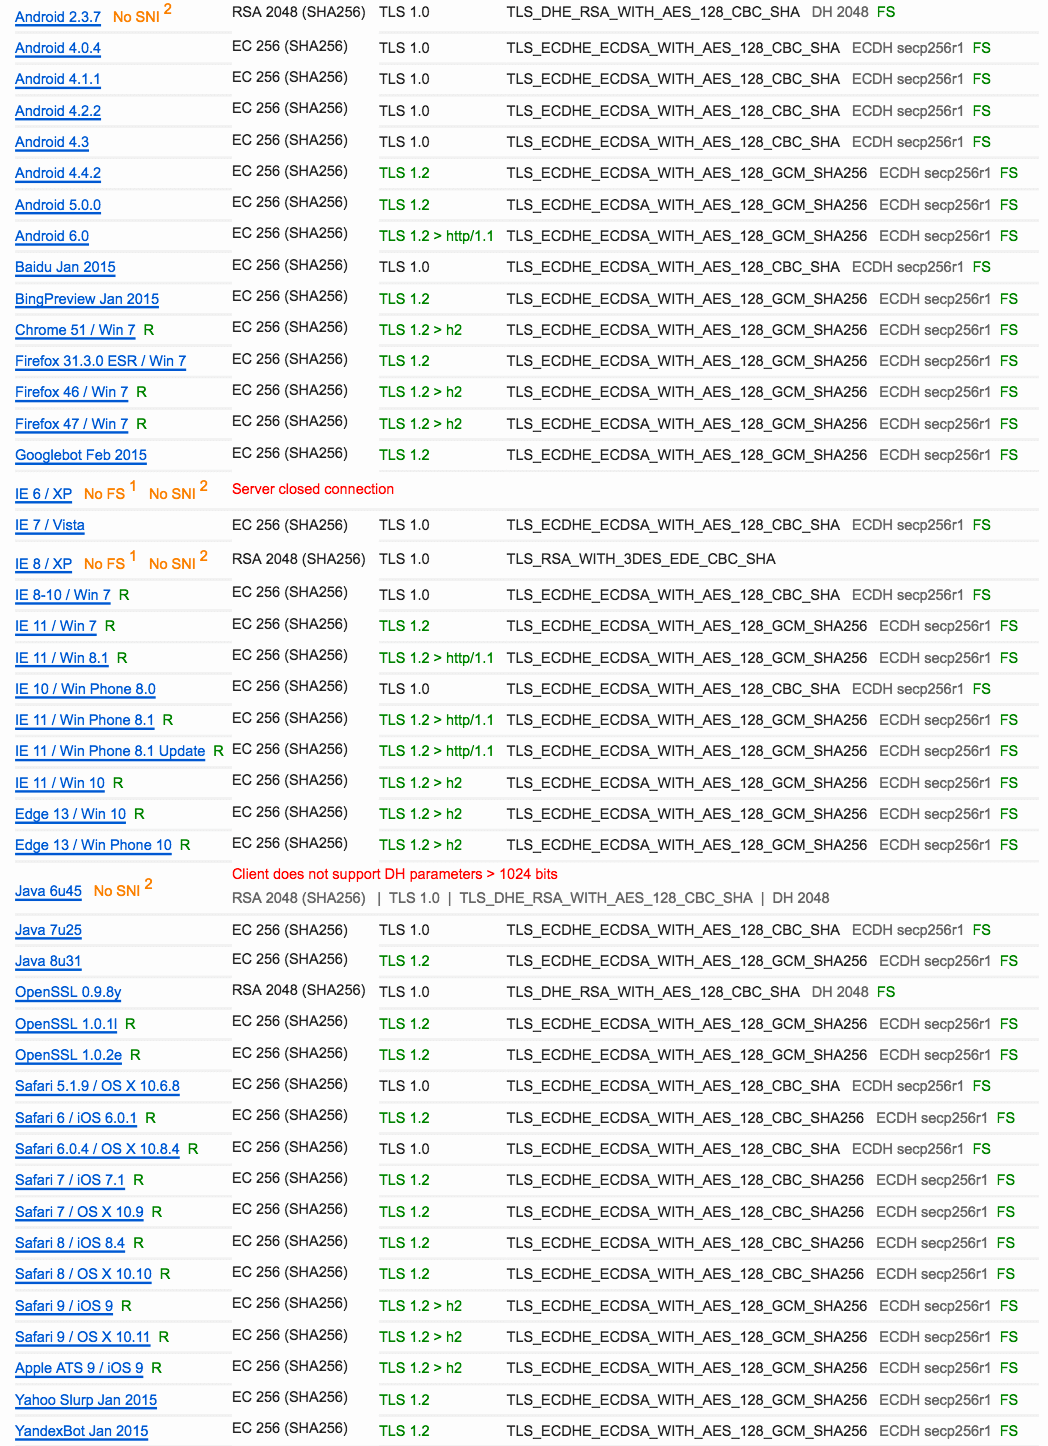
Don’t forget to nginx -s reload at the end, then go to SSL Labs to check the configuration, you can see that the old browsers use RSA certificates (I The server has a dedicated IP, so it can also be accessed without SNI support):

At this point, the ECDSA/RSA dual certificate configuration is complete, and you can view the certificate type in the browser:
